At the time of this blog post, AWS ELBs don't support WebSocket proxying when using the HTTP(s) protocol listeners. There are a few blog posts on how to work around it, but it takes some work and configuration. Using Docker, these complexities can be minimized.
In this post, we'll start at the very beginning. We'll spin up an ELB, configure its listeners, and then deploy an application to an EC2 instance.
What we're building
At the end of this post, we're going to setup an ELB to proxy all TCP traffic to Nginx, using the Proxy Protocol. Nginx will then read the Proxy Protocol and set the headers needed for the final application. At the end of the day, it'll look like this:
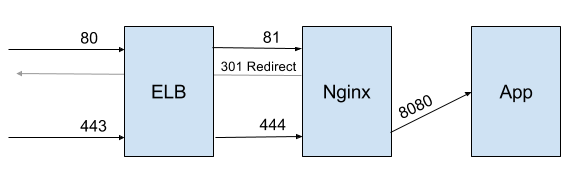
Why expose two different ports on Nginx? Nginx doesn't currently expose the proxy port, which would allow the X-Forwarded-Proto header to be set correctly. So, in the meantime, we're redirecting all HTTP traffic to HTTPS and then setting the X-Forwarded-Proto header to https.
Setting up an EC2 Instance
We first need to setup an EC2 instance that has Docker installed. If you have an AMI that has Docker already installed, feel free to use that too!
- In the EC2 panel, click the "Create Instance" button.
- For the AMI, I'm just selecting the Ubuntu Server 14.04 LTS instance, the latest Ubuntu just on the Quick Start.
- For Instance Type, I'm just using the t2.micro. Free tier all the way! :)
- For configuration, I'm just using all of the defaults.
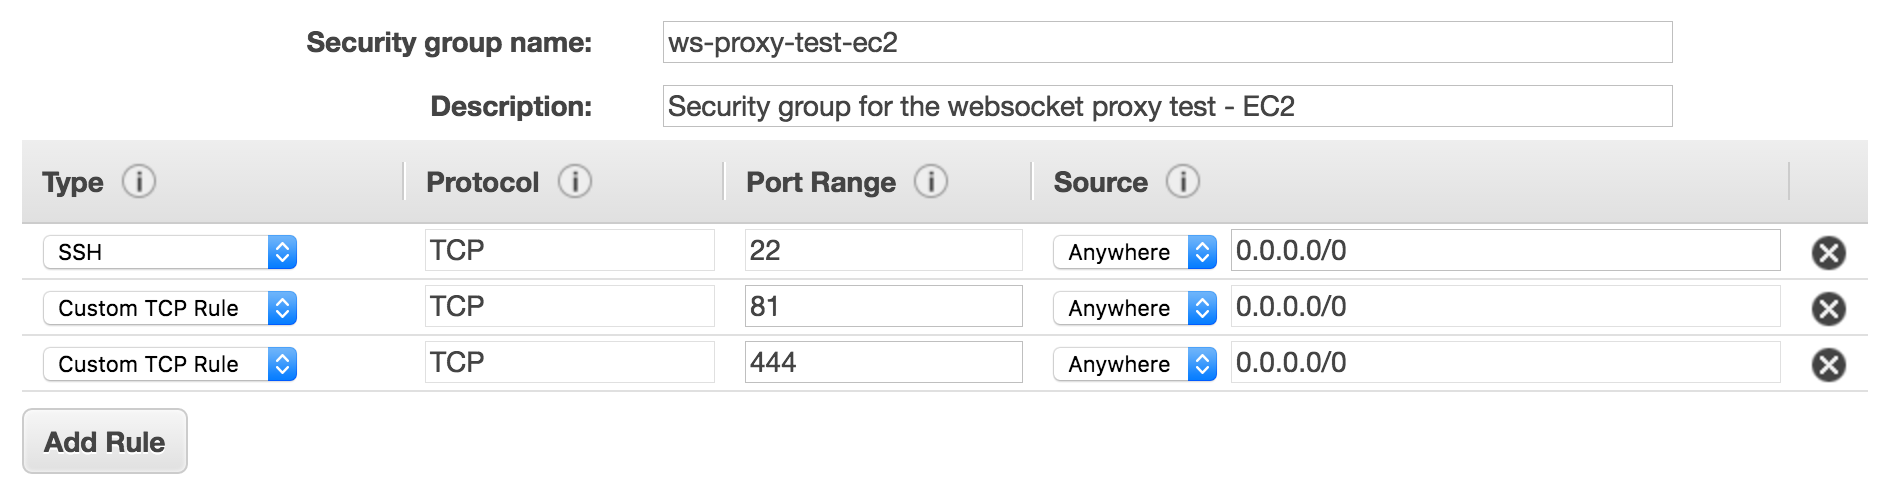
- Skip all the way to the security groups. You will want to expose ports 22, 81, and 444. For this exercise, feel free to open them up to the world (0.0.0.0/0). For a more secure environment, ports 81 and 444 will only receive traffic from the ELB and port 22 will be set to a much smaller range you can access.
- Launch!
- For kicks, I named my EC2 instance "ws-proxy-test-ec2", just to make it easier to see in the console.
- After the machine starts up, SSH in and install Docker using these instructions.
Creating up the ELB
Creating an ELB is pretty straight forward. But, in case you forgot, here's the quick how-to.
- In the EC2 panel, click the Load Balancers link in the left-side navigation.
- Click the Create Load Balancer button.
- In the definition, use the following settings:
- I used the name ws-proxy-test for the load balancer (feel free to modify)
- TCP port 80 will forward to TCP port 81
- SSL (Secure TCP) port 443 will forward to TCP port 444

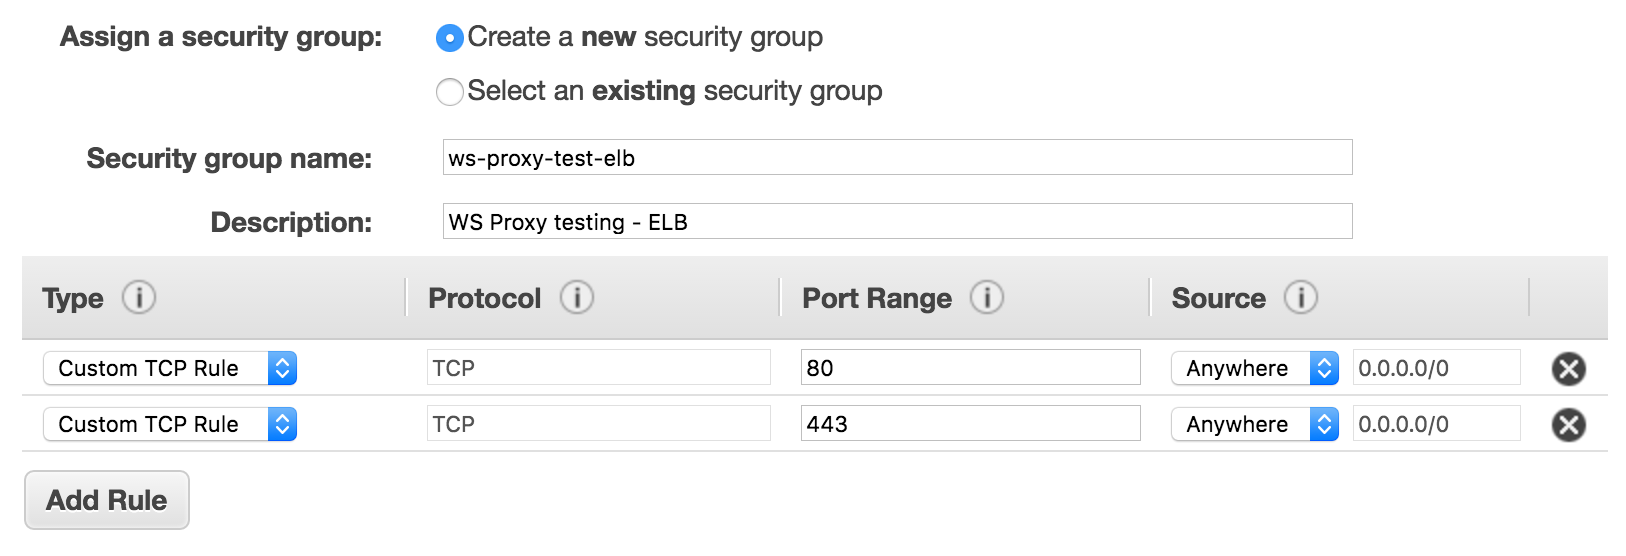
- For the Security Group, ensure you allow communication for ports 80 and 443 from anywhere.
- For Security Settings, use either a certificate you have in the system or setup a new certificate.
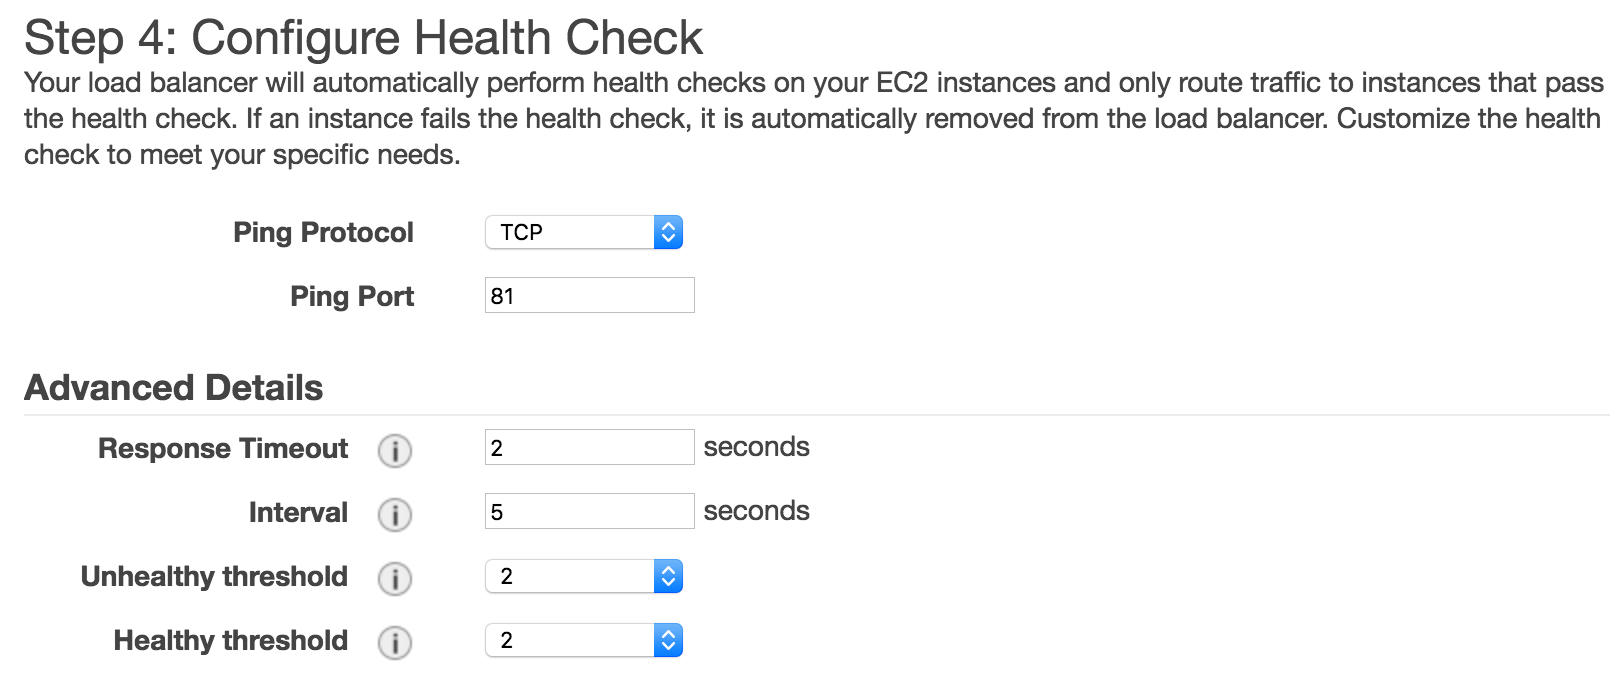
- For Healh Check configuration, I used the following settings, mostly to make it really responsive while testing:
- Ping Protocol: TCP
- Ping Port: 81
- Response Timeout: 2 seconds
- Interval: 5 seconds
- Unhealthy Treshold: 2
- Healthy Treshold: 2
- For the EC2 instances, add the one you created earlier.
- Launch the ELB!
Enabling Proxy Protocol on the ELB
Since Nginx will be listening on ports 81 and 444, we need to configure the ELB to use Proxy Protocol on those two ports. There's no way to do that in the AWS CLI. So, here's the commands…
aws elb create-load-balancer-policy --load-balancer-name ws-proxy-test --policy-name proxyProtocol-policy --policy-type-name ProxyProtocolPolicyType --policy-attributes AttributeName=ProxyProtocol,AttributeValue=true
aws elb set-load-balancer-policies-for-backend-server --load-balancer-name ws-proxy-test --instance-port 81 --policy-names proxyProtocol-policy
aws elb set-load-balancer-policies-for-backend-server --load-balancer-name ws-proxy-test --instance-port 444 --policy-names proxyProtocol-policy
If you named the ELB differently, change the load-balancer-name values appropriately.
Starting everything up!
The easiest thing to do here is to utilize Docker. I have a GitHub project that publishes a Docker image to make this super easy. And the easiest way to piece it all together is to make a Docker Compose file.
nginx_proxy:
  image: mikesir87/docker-nginx-elb-websocket
  environment:
    LISTEN_ON: 81
    LISTEN_ON_TLS: 444
    DESTINATION_HOSTNAME: backend
    DESTINATION_PORT: 8080
  ports:
    - "81:81"
    - "444:444"
  links:
    - "app:backend"
app:
  image: mikesir87/display-headers
This script configures the proxy container to listen to ports 81 and 444, which will then forward traffic to the linked container's port 8080. The linked container is found at the hostname "backend" due to the link.
So, in your own usage, you would swap out the image that the app service is using.
Once you have the YAML script in a docker-compose.yml, simply run docker-compose up -d.
At this point, you should be able to point your browser to the URL of your ELB and see the underlying application! WebSockets are now proxied and headers are set correctly.
Conclusion
AWS ELBs don't support WebSocket proxying with HTTP listeners. To support HTTP traffic, we added a Nginx reverse proxy to read the Proxy Protocol and set the appropriate headers. Using Docker makes this easily reproducible and makes forwarding of traffic from nginx to the application super easy, due to the named link.
Have questions? Let me know!